# Shoptet Integration
> Source: https://docs.recombee.com/shoptet_integration
> For the complete documentation index, see [llms.txt](/llms.txt).
**Table of contents**
* [Steps](#steps)
* [Catalog Feed](#catalog-feed)
* [Creating Scenario](#creating-scenario)
* [Interaction Tracking](#interaction-tracking)
* [Creating a No-Code Widget](#creating-a-no-code-widget)
* [Widget in Banner](#widget-in-banner)
* [Placing a Widget Using CSS](#id1)
* [Placing a Widget on a Specific Page](#placing-a-widget-on-a-specific-page)
# Shoptet Integration
Recombee can be used on any e-commerce site made with [Shoptet](https://shoptet.cz/).

* Real-time recommendations.
* 100+ algorithms.
* Fully customizable business rules.
## Steps
The integration process consists of multiple steps. This manual assumes usage of Shoptet themes, but even if your e-shop is tailor-made, you will only need to change some names and everything will work as expected.
First of all, you need to create your [Recombee account](https://admin.recombee.com/sign-up)with a 30-day free trial.
Following steps:
* Uploading your catalog feed with items
* Creating a scenario in your Recombee Admin UI
* Starting a tracking module for customer interactions
* Creating a No-Code Widget
* Placing the Widget on the Shoptet page
### Catalog Feed
Catalog feed gives Recombee access to your items and their properties (such as price, availability, etc.).
* In your Shoptet Admin console go to **Propojení/XML feedy**.
* Copy URL address of _Heureka.cz - Rozšířený feed_.
* In the section **Zabezpečení**, make sure you allow access from any IP address:
* Uncheck _Zakázat přístup z IP adres, které nejsou uvedené na globálním whitelistu_
* Login to your [Recombee Admin UI](https://admin.recombee.com/).
* Go to **Catalog feed** on the left menu in section **Integration**.
* Click on _Create feed_.
* Select _Heureka feed_.
* Paste in the URL address from Shoptet from the previous steps.
* Save Feed.
* After a few minutes, you should see a log with numbers of successfully uploaded items.
* Continue by creating a scenario, which is an application of recommendation.
### Creating Scenario
The scenario defines the way you want to show items to your customers.
* Read our detailed documentation on [how to make a scenario](/scenarios).
* Proceed to Interaction tracking of your customers.
### Interaction Tracking
Interactions represent the behavior of your customers, their preferences, and their taste. By sending us their interactions, Recombee can match what they would like to buy next.
* **Detail view**
* Detail view is an action of a customer viewing a specific product site and reading details such as price, brand, color, etc.
* **Cart addition**
* Interaction of customer putting an item to cart.
* **Purchase**
* Interaction of customer buying one or more products.
**Getting interactions**
To track your customers in real-time, you need to install the Recombee tracking module on your page.
First, download the module [here](/files/shoptet/tracking_module.js) and save it as _tracking\_module.js_.
* In your Recombee Admin UI in **General** go to section _Settings_.
* Find _API tokens_ and copy your _Public Token_.
* Open _tracking\_module.js_ in the text editor of your choice (for example, **Notepad** or **Atom**, don't use MS Word).
* Paste your _Public Token_ between quotes on the first line and end the line with a semicolon (;).
* On the next line write the _name of your database_ between quotes and end the line with a semicolon (;).
It should look like this:
JS
```
const publicToken = 'fFDj0Zkaz3036zLxmJWyy1jtbdvrgP4vL5vMHOklvMULjuD88qlPNk6Trv1ZlLYz';
const dbName = 'yourDatabaseName';
```
* Save the file.
* On your Shoptet Admin page go to **Vzhled a obsah**, section_Správce souborů_.
* Create a folder _js_.
* Open folder _js_.
* Upload the file _tracking\_module.js_.
* Save and exit.
* On your Shoptet Admin page, go to **Vzhled a obsah**, section_Editor_ and menu _HTML kód_.
* In the first text box _Záhlaví (před koncovým tagem HEAD)_ paste this code:
HTML
```
```
* In the second text box _Zápatí (před koncovým tagem BODY)_ paste this code:
HTML
```
```
* Save and exit.
Your interactions should be working. Check it in your Recombee Admin UI and proceed to widget creation - a place on your site for recommendations.
### Creating a No-Code Widget
You can create a No-Code Widget in our Admin UI or make one on your own. To make your No-Code Widget in the Admin UI, follow the steps at [No-Code Widget](/no-code-widgets).
Once your No-Code Widget is created:
* Copy the generated HTML code as shown in the picture below.
[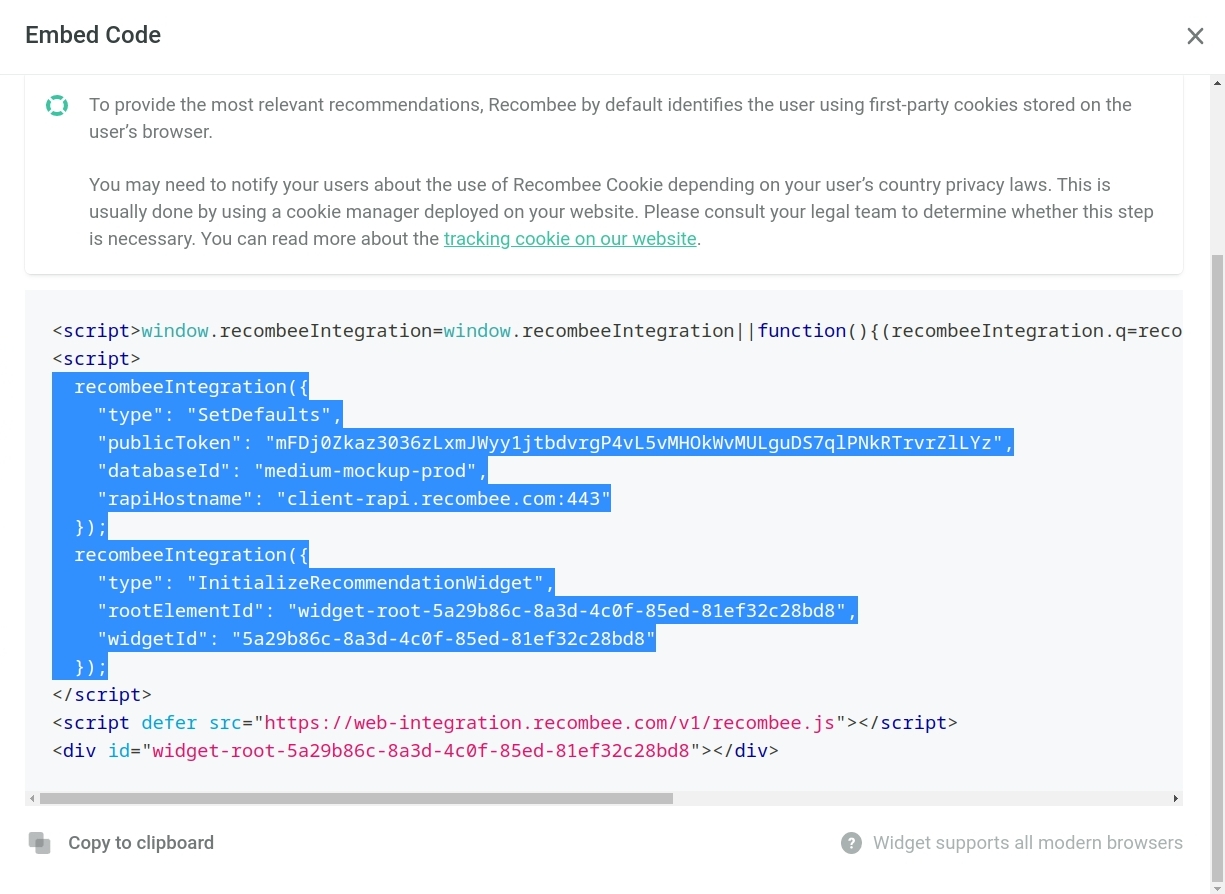](/img/shoptet/widget_code_selection.jpg)
* Open the text editor of your choice (for example, **Notepad** or**Atom**, don't use MS Word).
* Paste the copied HTML code.
* Save the file with the .js suffix. For example, save it as_widget.js_
### Widget in Banner
To show your No-Code Widget with recommendations on the site, you need to place it in a Shoptet banner or follow the steps in the following section [Placing a widget using CSS](/shoptet_integration#id1).
To place an No-Code Widget in a Shoptet banner:
* Open your Shoptet admin page.
* Go to **Vzhled a obsah** and select section **Bannery**.
* Click on an empty banner, for example, _Banner č. 3_.
* Change the type of banner in _Typ banneru_ to _Textový banner_.
* Check the _Zobrazit banner_ checkbox.
* Check both _Desktop_ and _Mobile_.
* Insert whole code from the file you created in the previous step (_widget.js_) to the box _Text nastavení._
* Save.
* Using the Shoptet Admin page, select the location of the banner with your No-Code Widget.
### Placing a Widget Using CSS
You can place an No-Code Widget anywhere on the site with our new feature[Position of the widget](/no-code-widgets#html-integration-positioning-of-the-widget).
**Element anchor**
First, you need to select an element on a specific page that will be used as an anchor. You can do it by opening the developer mode of the page and identifying the element selector. To learn more about element identifiers [click here.](https://www.w3schools.com/jquery/jquery_selectors.asp)
* Open your widget file (_widget.js_) in the text editor of your choice (for example, **Notepad** or **Atom**, don't use MS Word).
* Find the line which starts:
JS
```
recombeeIntegration({
"type": "InitializeRecommendationWidget",
"rootElementId": "widget-root-3a6f7234-1811-4b60-aa28-1cacf99d0666",
"widgetId": "3a6f7234-1811-4b60-aa28-1cacf99d0666",
"appendToElementSelector": ""});
```
* Notice the last line. Put your element selector there.
* Examples of use with element selector `div#description` to place No-Code Widget :
* **insertBeforeElementSelector**: The widget will be inserted before the first element matching this selector:
JS
```
"insertBeforeElementSelector": "div#description"
```
* **insertAfterElementSelector**: The widget will be inserted after the first element matching this selector.
JS
```
"insertAfterElementSelector": "div#description"
```
* **prependToElementSelector**: The widget will be inserted as the first child of the first element matching this selector.
JS
```
"prependToElementSelector": "div#description"
```
* **appendToElementSelector**: The widget will be inserted as the last child of the first element matching this selector.
JS
```
"appendToElementSelector": "div#description"
```
* Save the file and exit.
**JavaScript Shoptet Integration**
* On your Shoptet Admin page go to **Vzhled a obsah**, section_Správce souborů_.
* If not yet created, create a folder _js_.
* Open folder _js_.
* Upload your widget text file _widget.js_.
* On your Shoptet Admin page, go to **Vzhled a obsah**, section_Editor_ and menu _HTML kód_.
* In the second text box _Zápatí (před koncovým tagem BODY)_ paste this code at the end:
HTML
```
```
* Save and exit.
If you want to add more widgets, upload the text file of widgets and add the same code as in the step above with the changed name _widget.js_ to the name of your file.
### Placing a Widget on a Specific Page
Some pages can have specific widgets - for example, a page with the cart or product detail page. To do it, nest the widget code in `if condition`with a page keyword. Shoptet naming conventions give keywords for some specific pages:
| Keyword | Page |
| ------------- | ------------------------------ |
| homepage | Homepage |
| thankYou | Page after successful order |
| productDetail | Page with details of a product |
| cart | Page with cart content |
To position your widget on this site (e.g. `cart`):
* On your Shoptet Admin page go to **Vzhled a obsah**, section_Správce souborů_.
* Download your widget file from folder _js_.
* Open the widget file in the text editor of your choice (for example,**Notepad** or **Atom**, don't use MS Word).
* Add the if condition`if (dataLayer[0].shoptet.pageType === 'cart') {` at the first line.
* Add ending bracket `}` at the last line of your file.
* Save the file.
* On your Shoptet Admin page go to **Vzhled a obsah**, section_Správce souborů_.
* Upload the file.
* Save and exit.
Example of widget visible only in the cart.
JS
```
if(dataLayer[0].shoptet.pageType === 'cart') {
window.recombeeIntegration = window.recombeeIntegration || function() {
(recombeeIntegration.q = recombeeIntegration.q || [])
.push(arguments);
};
recombeeIntegration.l = +new Date();
recombeeIntegration ({
"type": "SetDefaults",
"publicToken": "mFDjOZkaz3036zLxmJWyy1jtbdvrgP4vL5vMHOkWvMULguDS7q1PNkRTrvrZ1LYz",
"databaseId" : "medium-mockup-prod",
"rapiHostname": "client-rapi.recombee.com:443"
});
recombeeIntegration({
"type": "InitializeRecommendationWidget",
"rootElementId": "widget-root-dab4bb53-0584-4b49-984f-1f5b2f4354a2",
"widgetId": "dab4bb53-0584-4b49-984f-1f5b2f4354a2",
"appendToElementSelector": "div.content-inner",
});
}
```