Getting Started
The first thing you need is your database at Recombee and the corresponding secret key. Create the free instant account at recombee.com, if you don't have one yet.
We provide client libraries (SDKs) for JavaScript, Java, Ruby, Node.js, Python,.NET, and PHP, which makes the integration very easy. If you don’t use any of these languages, then you can use directly the REST API (see this section for details about authentication).
How to integrate
Integration consist of four principal components:
It can be done in multiple ways.
The recommendations are usually shown to a user at a website, in a mobile app or within an email campaign.
Send interactions
Interactions are the most valuable information for the algorithms in the recommender engine.
There are multiple kinds of interactions in the system, but we will use just the following two for now:
- detail-view - it will be sent to the system every time a user views a detail of an item
- purchase - it will be sent every time a user completes the main desired goal (a conversion).
Please note that while Recombee assigns the term purchase to those interactions, they can have various forms depending on your specific business case, e.g. replying to an advertisement in case of a job agency, viewing the whole video in case of IPTV platform, or buying a product from an online store can all be assigned as purchase.
Detail View
A detail view of item xyz
by user 2c169e575644d840838e
is sent to the recommender with the following query.
// Import the library using npm or bower or using the script tag:
// <script src="https://cdn.jsdelivr.net/gh/recombee/js-api-client/dist/recombee-api-client.min.js"></script>
var client = new recombee.ApiClient('myDb', publicToken, {region: 'us-west'});
client.send(new recombee.AddDetailView('2c169e575644d840838e', 'xyz'))
.then(function(res) {
...
})
.catch(function(error) {
...
});
import com.recombee.apiclientkotlin.RecombeeClient
import com.recombee.apiclientkotlin.util.Region
import com.recombee.apiclientkotlin.requests.*
import com.recombee.apiclientkotlin.exceptions.ApiException
val client = RecombeeClient(
databaseId = "your-db-id",
publicToken = "your-public-token",
region = Region.UsWest
)
val request = AddDetailView(userId = "2c169e575644d840838e", itemId = "xyz")
client.send(request,
{ response ->
...
},
{ exception ->
...
}
)
// Alternatively, you can use sendAsync for coroutines instead of callbacks
from recombee_api_client.api_client import RecombeeClient, Region
from recombee_api_client.api_requests import *
client = RecombeeClient('myDb', private_token, region=Region.US_WEST)
client.send(AddDetailView("2c169e575644d840838e", "xyz", timestamp="2014-07-20T02:49:45+02:00", cascade_create=True))
require 'recombee_api_client'
include RecombeeApiClient
client = RecombeeClient.new('myDb', private_token, {:region => 'us-west'})
client.send(AddDetailView.new('2c169e575644d840838e', 'xyz', {'timestamp' => '2014-07-20T02:49:45+02:00', 'cascadeCreate' => true}))
RecombeeClient client = new RecombeeClient("myDb", privateToken).setRegion(Region.US_WEST);
client.send(new AddDetailView("2c169e575644d840838e", "xyz")
.setTimestamp(new SimpleDateFormat("yyyy-MM-dd HH:mm:ss").parse("2016-12-09 13:05:06") )
.setCascadeCreate(true));
<?php
use Recombee\RecommApi\Client;
use Recombee\RecommApi\Requests as Reqs;
$client = new Client("myDb", private_token, ['region' => 'us-west']);
$client -> send(new Reqs\AddDetailView("2c169e575644d840838e", "xyz", ['timestamp' => "2014-07-20T02:49:45+02:00", 'cascadeCreate' => true]));
?>
using Recombee.ApiClient;
using Recombee.ApiClient.ApiRequests;
using Recombee.ApiClient.Bindings;
using Recombee.ApiClient.Util;
var client = new RecombeeClient("myDb", privateToken, region: Region.UsWest);
var datetime = DateTime.Parse("2014-07-20T02:49:45+02:00", null, System.Globalization.DateTimeStyles.RoundtripKind);
client.Send(new AddDetailView("2c169e575644d840838e", "xyz", timestamp: datetime, cascadeCreate: true));
var recombee = require('recombee-api-client');
var rqs = recombee.requests;
var client = new recombee.ApiClient('myDb', privateToken, {region: 'us-west'});
client.send(new rqs.AddDetailView('2c169e575644d840838e', 'xyz', {timestamp: '2014-07-20T02:49:45+02:00', cascadeCreate: true}),
(err, response) => {
//...
}
);
import (
"github.com/recombee/go-api-client/v4/recombee"
"time"
)
client, err := recombee.NewRecombeeClient("myDb", privateToken, "us-west")
if err != nil {
panic(err)
}
_, err = client.NewAddDetailView("2c169e575644d840838e", "xyz").SetCascadeCreate(true).SetTimestamp(time.Unix(1712042581, 0)).Send()
POST /myDb/detailviews/ HTTP/1.0
Host: Based on the region of your DB, see https://docs.recombee.com/regions.html
Content-type: application/json
Body:
{
"itemId": "xyz",
"userId": "2c169e575644d840838e",
"timestamp": "2014-07-20T02:49:45+02:00",
"cascadeCreate": true
}
myDb
is the name of your database :)region
should be set to the region where your DB is locateditemId
is a unique identifier of the item.userId
is a unique identifier of the user. It might be for example a session ID for anonymous users.
Optional parameters
timestamp
is a UNIX timestamp or ISO 8601 date time of the view. If not specified, the current time is used.cascadeCreate
tells the system that it should create the item or the user if it doesn’t exist in the system yet. We don’t have to explicitly manage the user and item database in the system for now thanks to this parameter. It is set totrue
by default in the JavaScript client.
Purchase
Sending a purchase is very similar.
client.send(new recombee.AddPurchase('2c169e575644d840838e', 'xyz', {'recommId': 'db021f23-9e18-4af4-bb71-8ecaf27b615d'}))
.then(function(res) {
...
})
.catch(function(error) {
...
});
val request = AddPurchase(
userId = "2c169e575644d840838e",
itemId = "xyz",
recommId = "db021f23-9e18-4af4-bb71-8ecaf27b615d"
)
client.send(request,
{ response ->
...
},
{ exception ->
...
}
)
client.send(AddPurchase("2c169e575644d840838e", "xyz", recomm_id="db021f23-9e18-4af4-bb71-8ecaf27b615d", cascade_create=True))
client.send(AddPurchase.new('2c169e575644d840838e', 'xyz', {:recomm_id => 'db021f23-9e18-4af4-bb71-8ecaf27b615d', :cascade_create => true}))
client.send(new AddPurchase("2c169e575644d840838e", "xyz")
.setRecommId("db021f23-9e18-4af4-bb71-8ecaf27b615d")
.setCascadeCreate(true));
<?php
$client -> send(new Reqs\AddPurchase("2c169e575644d840838e", "xyz", ['recommId' => 'db021f23-9e18-4af4-bb71-8ecaf27b615d', 'cascadeCreate' => true]));
?>
client.Send(new AddPurchase("2c169e575644d840838e", "xyz", recommId: "db021f23-9e18-4af4-bb71-8ecaf27b615d", cascadeCreate: true));
client.send(new rqs.AddPurchase('2c169e575644d840838e', 'xyz', {recommId: 'db021f23-9e18-4af4-bb71-8ecaf27b615d', cascadeCreate: true}),
(err, response) => {
//...
}
);
_, err = client.NewAddPurchase("2c169e575644d840838e", "xyz").SetRecommId("db021f23-9e18-4af4-bb71-8ecaf27b615d").Send()
POST /myDb/purchases/ HTTP/1.0
Host: rapi.recombee.com
Content-type: application/json
Body:
{
"itemId": "xyz",
"userId": "2c169e575644d840838e",
"recommId": "db021f23-9e18-4af4-bb71-8ecaf27b615d",
"cascadeCreate": true
}
This time we are sending the optional recommId
parameter: Once you integrate the recommendations, you shall start setting this parameter for interactions that are based on a previous recommendation (see more in the section about recommendations). You will get precise success metrics in the Admin UI metrics and improved feedback for the models.
The quality of the recommendations heavily depends on the amount of the sent interactions so it may take some time before interactions are gathered and the best quality recommendations are produced. Submitting historical interactions should reduce this time.
Especially in e-commerce is very common that a user comes to the site as an anonymous user (identified by a session id) and logs into a regular account later. Then it’s useful to merge the anonymous user with the regular account, in order to enrich the regular account with interactions made before logging in. Use merge users request for this.
Manage item catalog
The second most important kind of data for the recommender system is information about the items (e.g, names, descriptions, categories).
Sent data about items can be used for filtering and boosting recommendation results with the ReQL and also for showing the recommended items to the users (see the next section). The items catalog is also used for computing the recommendations, especially in the case of items with a few interactions (for example newly added items).
For security reasons, it is possible to change the item catalog only from the server-side using the private token.
An alternative to using SDK for catalog synchronization is setting a catalog feed in the Recombee Admin UI. Skip to getting recommendations if you have already synchronized the properties using the catalog feed.
Adding item properties
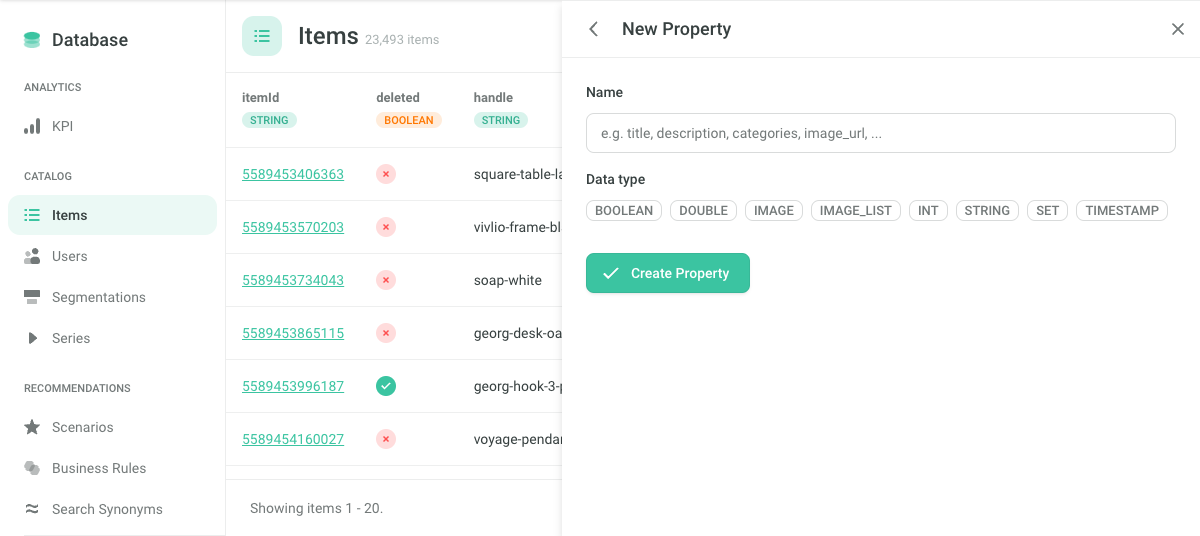
Firstly you have to define the properties of items that you want to submit to the system. Creating an item property is somehow equivalent to adding a column to the table of items, so you can later assign some particular value of the property to each item.
The properties may be of various types:
string
int
- integer numberdouble
- floating point numberboolean
- true / falsetimestamp
- UTC timestampset
- a set of stringsimage
- URL of an imageimageList
- array with URLs of images
You can create the properties in the Admin UI.
Alternatively, you can add them by calling the API endpoint.
The default value of the created properties is null
.
Integration Tips page contains examples of properties that are useful for the recommender engine.
Send item values
Now we can set the values of these properties for a particular item xyz
. It is done by the following request.
client.send(SetItemValues('xyz',
{
"title": "Television TV2305",
"description": "HD resolution LED TV",
"price": 200,
"categories": ["Electronics", "Televisions"],
"image": "http://examplesite.com/products/xyz.jpg",
"deleted": False
},
cascade_create=True
))
client.send(SetItemValues.new('xyz',
# values
{
'title' => 'Television TV2305',
'description' => 'HD resolution LED TV',
'price' => 200,
'categories' => ['Electronics', 'Televisions'],
'image' => 'http://examplesite.com/products/xyz.jpg',
'deleted' => false
},
# optional parameters
{
'cascadeCreate' => true
}
))
client.send(new SetItemValues("xyz",
new HashMap<String, Object>() {{
put("title", "Television TV2305");
put("description","HD resolution LED TV");
put("price", 200);
put("categories", new String[]{"Electronics", "Televisions"});
put("image", "http://examplesite.com/products/xyz.jpg");
put("deleted", false);
}}
).setCascadeCreate(true));
<?php
$client -> send(new Reqs\SetItemValues("xyz",
// values
[
"title" => "Television TV2305",
"description" => "HD resolution LED TV",
"price" => 200,
"categories" => ["Electronics", "Televisions"],
"image" => "http://examplesite.com/products/xyz.jpg",
"deleted" => false
],
//optional parameters
[
"cascadeCreate" => true
]
));
?>
client.Send(new SetItemValues("xyz",
new Dictionary<string, object>() {
{"title", "Television TV2305"},
{"description","HD resolution LED TV"},
{"price", 200},
{"categories", new string[] {"Electronics", "Televisions"}},
{"image", "http://examplesite.com/products/xyz.jpg"},
{"deleted", false}
},
cascadeCreate: true
));
client.send(new rqs.SetItemValues('xyz',
// values
{
title: 'Television TV2305',
description: 'HD resolution LED TV',
price: 200,
categories: ['Electronics', 'Televisions'],
image: 'http://examplesite.com/products/xyz.jpg',
deleted: false
},
// optional parameters
{
cascadeCreate: true
}
),
(err, response) => {
//...
}
);
_, err = client.NewSetItemValues("xyz", map[string]interface{}{
"title": "Television TV2305",
"description": "HD resolution LED TV",
"price": 200,
"categories": []string{"Electronics", "Televisions"},
"deleted": false,
"image": "http://examplesite.com/products/xyz.jpg",
}).SetCascadeCreate(true).Send()
POST /myDb/items/xyz HTTP/1.0
Host: rapi.recombee.com
Content-type: application/json
Body:
{
"title": "Television TV2305",
"description": "HD resolution LED TV",
"price": 200,
"categories": ["Electronics", "Televisions"],
"deleted": false,
"image": "http://examplesite.com/products/xyz.jpg",
"!cascadeCreate": true
}
The cascadeCreate
indicates that the item of the given itemId should be created if it does not exist in the database.
You can check that the values have been successfully set in the Admin UI.
Sending a whole large catalog via single requests may be quite slow – batch requests should be used for much faster execution.
Similar to item properties are user properties.
Now to sure yet how to implement sending of the items catalog? See the tutorial.
Get recommendations
Now it’s time to get the recommendations!
There are two possible ways how to get the recommendations.
Using HTML Widget
HTML Widgets are the easiest way how to get recommendations into your site.
Each Widget is linked to a Scenario - a place at your site where the recommendations are displayed. You can set various settings for each Scenario in the Admin UI (see this section).
The Scenario also defines the type (endpoint) of the recommendations:
- Recommend items to user - The system recommends items to a given user depending on his/her personal taste. This case can be used for example at your homepage.
- Recommend items to item - The system recommends items that are somehow related to a given item. The system can take into account also a target user, so this case is useful for example in a detail page of a product or article because the endpoint will give the user a list of related items that he/she might be also interested in.
- Search items - A personalized full-text search based on the user’s query.
To create a new Widget, log in to the Admin UI, navigate to your Database, and pick Widgets in the menu on the left and click Create Widget. If you don’t have a Scenario created yet, you will be prompted to create one.
You can set which item properties will be shown in the Widget and also all kinds of visual settings (e.g. font, colors, borders, and many more). You can also set how many items will be shown at different types of devices.
When you have the Scenario configured and you are satisfied with the design of the widget, you can display it at your site by pasting the generated JavaScript embed code into the source code of your website.
In the case of Recommend items to item you need to set the itemId embed code parameter to the ID of the currently displayed item.
Once you put the embed code into your website, you can modify the widget in Admin UI without any need to change the code of your website.
Read more about the HTML Widget.
Using SDK
We will use two endpoints:
- recommend items to user - The system recommends items to a given user depending on his/her personal taste. This case can be used for example at your homepage.
- recommend items to item - The system recommends items that are somehow related to a given item. The system can take into account also a target user, so this case is useful for example in a detail page of a product, or article because the endpoint will give the user a list of related items that he/she might be also interested in.
Recommend Items to User
Getting 5 recommendations for user 2c169e575644d840838e
is very easy.
client.send(new recombee.RecommendItemsToUser('2c169e575644d840838e', 5))
.then(function(res) {
...
})
.catch(function(error) {
...
});
val result = client.sendAsync(RecommendItemsToUser("2c169e575644d840838e", 5))
result.onSuccess { response: RecommendationResponse ->
for (recommendedItem in response.recomms) {
println("ID: ${recommendedItem.id}}")
}
}.onFailure { exception -> // ApiException
println("Exception: $exception")
// use fallback ...
}
recommended = client.send(RecommendItemsToUser('2c169e575644d840838e', 5))
recommended = client.send(RecommendItemsToUser.new('2c169e575644d840838e', 5))
RecommendationResponse recommended = client.send(new RecommendItemsToUser("2c169e575644d840838e", 5));
//There are two easy ways for getting individual recommendations:
// 1. using getIds() method
String[] recomms = recommended.getIds();
// 2. iterating over recommendations
for(Recommendation r: recommended)
{
r.getId();
}
<?php
$recommended = $client -> send(new Reqs\RecommendItemsToUser("2c169e575644d840838e", 5));
?>
RecommendationResponse recommended = client.Send(new RecommendItemsToUser("2c169e575644d840838e", 5));
// Iterating over recommendations:
foreach(Recommendation r in recommended.Recomms)
{
Console.WriteLine(r.Id);
}
client.send(new rqs.RecommendItemsToUser('2c169e575644d840838e', 5),
(err, response) => {
//...
}
);
recommendReq := client.NewRecommendItemsToUser("2c169e575644d840838e", 5)
recommendRes, err := recommendReq.Send()
if err != nil {
panic(err)
}
for _, rec := range recommendRes.Recomms {
fmt.Println(rec.Id)
}
GET /myDb/recomms/users/2c169e575644d840838e/items/?count=5
An object with recommended items in field recomms
is returned. For example
{
"recommId": "968d7864-1d52-4525-a37f-d5b7dd86fe13",
"recomms": [
{
"id": "item-146"
},
{
"id": "item-462"
},
{
"id": "item-463"
},
{
"id": "item-1555"
},
{
"id": "item-683"
}
]
}
Besides the IDs of the recommended items, a unique recommId is returned. If the user interacts (views, purchases, etc.) with a recommended item, you shall set this ID to the recommId parameter of that interaction. You will get precise success metrics in the Admin UI metrics and improved feedback for the models.
Recommend Items to Item
Getting recommendations based on item xyz
which is viewed by user 2c169e575644d840838e
is also easy.
client.send(new recombee.RecommendItemsToItem('xyz', '2c169e575644d840838e', 10,
{
'scenario': 'product_detail',
'returnProperties': true,
'cascadeCreate': true
}
))
.then(function(res) {
...
})
.catch(function(error) {
...
});
val request = RecommendItemsToItem(
itemId = "xyz",
targetUserId = "2c169e575644d840838e",
count = 10,
scenario = "product_detail",
returnProperties = true,
cascadeCreate = true
)
val result = sendAsync(request)
result.onSuccess { response: RecommendationResponse ->
for (recommendedItem in response.recomms) {
println("ID: ${recommendedItem.id}}")
}
}.onFailure { exception -> // ApiException
println("Exception: $exception")
// use fallback ...
}
recommended = client.send(RecommendItemsToItem('xyz', '2c169e575644d840838e', 10,
scenario='product_detail',
return_properties=True,
cascade_create=True))
recommended = client.send(RecommendItemsToItem.new('xyz', '2c169e575644d840838e', 10,
{
'scenario' => 'product_detail',
'returnProperties' => true,
'cascadeCreate' => true
})
)
RecommendationResponse recommended = client.send(new RecommendItemsToItem("xyz", "2c169e575644d840838e", 10))
.setScenario("product_detail")
.setReturnProperties(true)
.setCascadeCreate(true);
<?php
$recommended = $client -> send(new Reqs\RecommendItemsToItem('xyz', '2c169e575644d840838e', 10,
[
'scenario' => 'product_detail',
'returnProperties' => true,
'cascadeCreate' => true
])
);
?>
RecommendationResponse recommended = client.Send(new RecommendItemsToItem("xyz", "2c169e575644d840838e", 10,
scenario: "product_detail",
returnProperties: true,
cascadeCreate: true));
client.send(new rqs.RecommendItemsToItem('xyz', '2c169e575644d840838e', 10,
{
'scenario': 'product_detail',
'returnProperties': true,
'cascadeCreate': true
}
),
(err, response) => {
//...
}
);
recommendReq := client.NewRecommendItemsToItem("xyz", "2c169e575644d840838e", 10).
SetScenario("product_detail").
SetReturnProperties(true).
SetCascadeCreate(true)
recommendRes, err := recommendReq.Send()
GET /myDb/recomms/items/xyz/items/?count=10&targetUserId=2c169e575644d840838e&scenario=product_detail&returnProperties=true&cascadeCreate=true
In this case, three optional parameters were also set: scenario
, returnProperties
, and cascadeCreate
.
A scenario defines a particular application of recommendations at your website, your mobile app or emailing campaign. Some examples can be homepage, watch-next, product-detail, cart, or emailing-after-purchase.
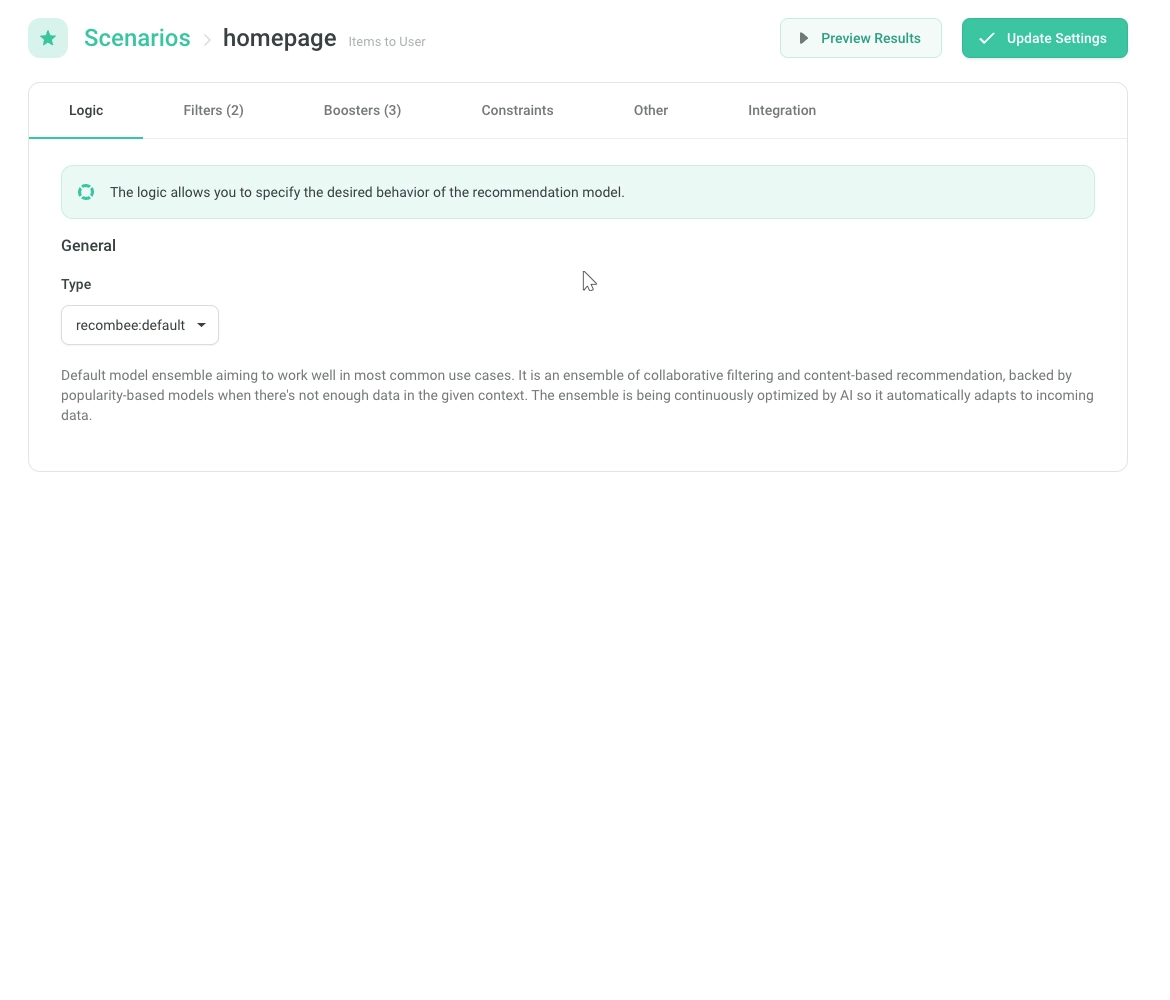
For each of the scenarios various parameters can be set in the Recombee Admin UI:
- Logic, which specifies the desired behavior of the recommendation model.
- Filters & Boosters, by which you specify your business rules (which items can be recommended and which items should be preferred).
- Constraints, by which you can specify the number of allowed items in the recommendation response per category, brand, or other criteria.
See the Integration Tips for examples of typical scenarios in a particular domain (media, e-commerce, real estate, etc.) and suggested settings.
If you prefer to set these parameters via API, see the details here.
Recommend Item Segments
Recombee can also recommend Item Segments such as categories, genres, or brands. See this section for more info.
Tips and Tricks
-
By enabling
returnProperties
Recombee returns also properties (titles, links, image URLs, etc.) for the recommended items. You can use these data for showing the items to the users. -
If the given user or item does not exist in the system yet (for example because the item catalog is updated periodically only once a day) the default behavior is to return an error (HTTP 404).
Setting
cascadeCreate=true
tells the recommender to rather create the missing item/user instead. Some bestsellers/trending content will be recommended to these completely new (cold start) items/users without interactions and properties.cascadeCreate
is set totrue
by default in the JavaScript client. -
If the user scrolls down or goes to the next results page, you can show the user subsequent recommendation results by requesting Recommend next items endpoint. You can create an infinite scroll of recommendations by calling this endpoint repeatedly.
-
Recombee can also recommend users instead of items - check recommend users to item and recommend users to user requests.
Now to sure yet how to implement sending interactions & getting recommendations? See the tutorial.
Personalized Search
Our personalized full-text search enhances the search experience at your site.
The results of the search are based on the provided search query and also on the user’s past interactions (purchases, ratings, etc.) with the items. Items more suitable for the user are preferred in the results.
Besides the API endpoint, we also provide a Quick Search HTML Widget.
client.send(new recombee.SearchItems('user-13434', 'search query', 5,
{
'scenario': 'search_top',
'returnProperties': true,
'cascadeCreate': true
}
))
.then(function(res) {
...
})
.catch(function(error) {
...
});
val request = SearchItems(
userId = "user-13434",
searchQuery = "search query",
count = 5,
scenario = "search_top",
returnProperties = true,
cascadeCreate = true
)
client.send(request,
{ response: SearchResponse ->
// Handle successful response here...
},
{ exception: ApiException ->
// Handle exception here...
}
)
matches = client.send(SearchItems('user-13434', 'search query', 5,
scenario='search_top',
return_properties=True,
cascade_create=True))
matches = client.send(SearchItems.new('user-13434', 'search query', 5,
{
'scenario' => 'search_top',
'returnProperties' => true,
'cascadeCreate' => true
})
)
SearchResponse matches = client.send(new SearchItems("user-13434", "search query", 5))
.setScenario("search_top")
.setReturnProperties(true)
.setCascadeCreate(true);
<?php
$matches = $client -> send(new Reqs\SearchItems('user-13434', 'search query', 5,
[
'scenario' => 'search_top',
'returnProperties' => true,
'cascadeCreate' => true
])
);
?>
SearchResponse matches = client.Send(new SearchItems("user-13434", "search query", 5,
scenario: "search_top",
returnProperties: true,
cascadeCreate: true));
client.send(new rqs.SearchItems('user-13434', 'search query', 5,
{
'scenario': 'search_top',
'returnProperties': true,
'cascadeCreate': true
}
),
(err, matches) => {
//...
}
);
searchReq := client.NewSearchItems("user-13434", "search query", 5).
SetScenario("search_top").
SetReturnProperties(true).
SetCascadeCreate(true)
searchRes, err := searchReq.Send()
GET /myDb/search/users/user-13434/items/?searchQuery=query&scenario=search_top&returnProperties=true&cascadeCreate=true